HardwareGaming PCsDon’t try and squeeze too many ideas inside one PC build: For this white gaming PC with an RTX 4080 Super, I very nearly didWhen you purchase through links on our site, we may earn an affiliate commission.Here’s how it works.
HardwareGaming PCsDon’t try and squeeze too many ideas inside one PC build: For this white gaming PC with an RTX 4080 Super, I very nearly didWhen you purchase through links on our site, we may earn an affiliate commission.Here’s how it works.
When you purchase through links on our site, we may earn an affiliate commission.Here’s how it works.
Jump to:The partsThe buildThe performanceThe conclusion
Jump to:The partsThe buildThe performanceThe conclusion
We test a lot of components at PC Gamer. We’re often swapping GPUs, CPUs, SSDs and RAM between test rigs to find out whether they’re worth your cash. Yet an important question to ask yourself when digging into the data is: “what’s it like to actually build a PC with this stuff?” To answer that, I’m actually building a PC with this stuff.
I’m putting together a gaming PC using some of the latest components around. You’ll find a parts list of what I picked and why, a build log covering the process of putting the PC together, and some reflections on what I’d do differently next time below. There will be a next time, too. You can catch all the PC builds from myself and the team in coming months, covering a range of budgets and form factors, right here on PC Gamer.
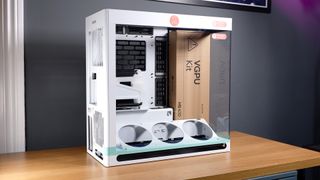
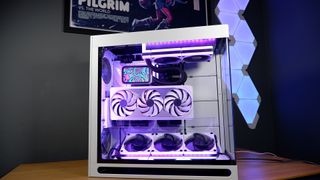
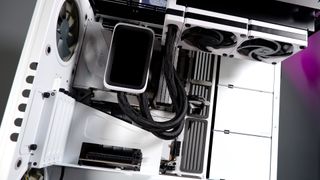
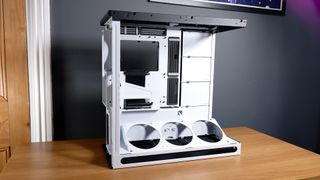
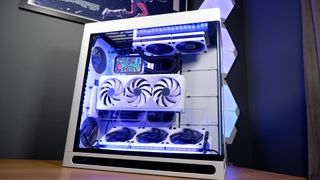
For this inaugural build, I’ve gone for one of the latest PC cases on the market, theHavn HS 420 VGPU, and stuffed it with the finest white components money can buy. This build is all about trying to distract you from actually playing any games on it and instead just staring wide-eyed through its panoramic window at the vertically mountedRTX 4080 Superand ludicrous CPU cooler within. It’s a beauty, but it wasn’t always. Much like I imagine Michelangelo had, at times, regrets about David’s nude frame, so too do I have some regrets here.
On that undeservedly big-headed note, let’s get on with the build.
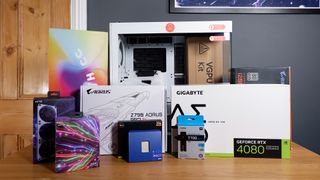
The parts
(Image credit: Future)
Swipe to scroll horizontally
Total:~$3,231 | ~£3,021
If I’d have skimped out on any of the components within this case, I’d have angry PC gamers knocking at my door. You don’t get a chassis with a panoramic curved glass side panel and vertical GPU mounting to stick beaten-up old junk inside it.
No, that just won’t do.
Let’s start with the chassis. This isHavn’s HS 420and it’s about as extravagant a dual-chamber case as you’ll find on the market today.
(Image credit: Future)
Havn is a new brand from Pro Gamers Group, which owns a few other notable brands in the PC hardware space: Ducky, Noblechairs, Aerocool, and ThunderX3, to name a few; and also major European retailers Overclockers and Caseking. The HS 420 is the brand’s first product and a company representative tells me it’s a completely custom design from the ground up.
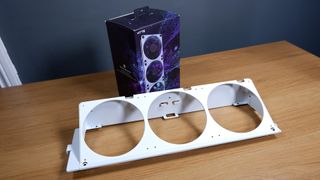
There are two versions of the HS 420: the standard model for$199/£200and the VGPU model for$269/£270. The latter offers an additional vertical GPU mounting bracket and 45 degree fan mount, and that’s the option I’ve gone with for this build.
I first caught a glimpse of this case on a rotating plinth atPro Gamers Group’s booth at Computex 2024. Thankfully, it looks just as good in somewhat less luxurious digs, i.e. my office.
It’s a great candidate for a showcase build such as this as the glass side panel extends right across the front of the case uninterrupted—this is a fully panoramic PC case with a single sheet of glass carefully curved to fit the capacious chassis. You’d think that’d make for a clumsy PC case to install or remove parts inside but it all peels away with ease.
A handful of screws sit under the magnetic dust cover on the top and each panel can then be lifted off without any extra tools, exposing the entire inner frame for easy access. The rear and top panels also feature this excellent striped design, which is more than simple aesthetics, as each strip is cut-out of the panel to give this machine a little more room to breathe.
Image1of2(Image credit: Future)(Image credit: Future)
Image1of2(Image credit: Future)(Image credit: Future)
Image1of2
(Image credit: Future)(Image credit: Future)
(Image credit: Future)(Image credit: Future)
(Image credit: Future)
(Image credit: Future)
(Image credit: Future)
(Image credit: Future)
(Image credit: Future)

(Image credit: Future)
(Image credit: Future)
(Image credit: Future)
(Image credit: Future)
(Image credit: Future)
(Image credit: Future)
While the fans will whirr to life with a modern game running, generally this choice of GPU led to fantastically low temperatures and noise levels.
With a price of $1,150 / £1,026 / $1,846 AUD, the GPU is far from the cheapest option around. If you want to save pennies, check out ourBlack Friday graphics card dealspage. That said, the model I’ve chosen here is one of very few all-white GPUs on the market, and it performs well. For that reason, it feels overpriced to me—not any more than the RTX 4080 Super does in general, anyways.
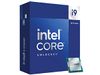
My choice of CPU is the unequivocally speedyIntel Core i9 14900K. Now, this chip has a shaky history with instability but it is one of the fastest gaming processors available today, even in light of the recent release of theIntel Core Ultra 9 285K.
(Image credit: Future)
To combat the Core i9’s proclivity to chug watts like cheap beer, I picked theHyte Thicc Q60 all-in-one liquid cooler. This comes with a 240 mm radiator and a high absurdity factor for the inclusion of an Android-powered screen. Yep, that’s practically a mobile phone on top of the cold plate, capable of displaying widgets programmed via the Hyte Nexus application, including album art or key temperature readouts.
(Image credit: Future)
TheHyte Q60was a mistake. I can admit that in hindsight. I’ll detail this further in the build guide below, but if you’re considering the Havn HS 420 for your own PC build, I’d opt for a full 360 mm radiator and a cold plate without an enormous screen attached. That should be easy, there are next to no other coolers with such enormous screens attached.
The Hyte Q60 does have one major benefit. It offers an easy way to connect system fans and RGB LED strips over proprietary magnetic connectors and USB Type-C. In fact, all except a pair ofNoctua NF-P12 redux-1700fans in this build were hooked up via a single cable run from the radiator and around the perimeter of the case. That’s three Thicc FP12 fans and three LS12 light strips using the control hubinsidethe all-in-one liquid cooler, which is a good way to save on messy cables.
I had to adjust my memory configuration due to the Hyte cooler: just two out of four sticks of theV-Color Manta XPrism 32 GB DDR5-6200 kitwould fit alongside its screen. That won’t have any impact on the performance of this PC, however. The two DIMMs I was unable to install were only dummy sticks for uniform RGB effects—the capacity and speed remain the same.
(Image credit: Future)
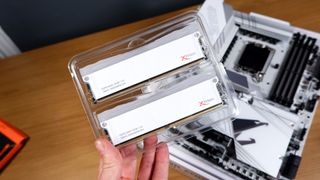
The 6200 MT/s RAM kit hits a sweet spot for speed and latency with Intel’s 14th Gen platform. You can push for higher speeds but usually at a cost to latency or, well, actual cost. This Manta kit hits a CAS latency of 36, which is a healthy middle ground for available DDR5 kits.
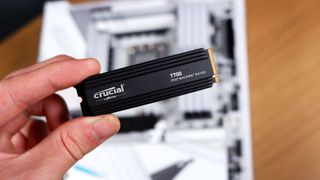
For storage, I’ve opted for a single PCIe 5.0 NVMe SSD for this machine: Crucial’s T700. Rated to 12,400 MB/s sequential reads and 11,800 MB/s sequential writes, it’s no slouch. A PCIe 5.0 drive is overkill for most PC gamers right now and I’d absolutely recommend cutting this for a cheaper PCIe 4.0 drive to try to cut down costs with this build, but it means I don’t have to think about upgrading the boot drive anytime soon.
(Image credit: Future)
Lastly, the PSU. First, let me say I had hoped to use something different here, a more reasonable model with white cabling. It wasn’t available and I plucked this PSU out of my test bench to replace it. It’s not a sensible pick for this machine for two reasons: 1) it has a screen plastered on one side of it that won’t be in any way visible from inside the Havn’s second, rear chamber; and 2) it has more wattage than even this powerful PC requires at 1,200 watts. That’s huge and much better suited to anRTX 4090.
After receiving the last few parts in the mail, I was finally ready to assemble the PC. Looking forward to my colourful combination of cooler, RAM and GPU with wide eyed optimism. Of course, none of that went to plan, but that’s just the way it is with PC building sometimes.
Intel Core i9 14900K$433.11ViewSee all prices
Intel Core i9 14900K$433.11ViewSee all prices
Intel Core i9 14900K
Intel Core i9 14900K

$433.11View
$433.11
$433.11
See all prices

$279.99View
$279.99
$279.99
See all prices
Crucial T700 SSD 2TB$209.99$185.08ViewSee all prices
Crucial T700 SSD 2TB$209.99$185.08ViewSee all prices

Crucial T700 SSD 2TB
Crucial T700 SSD 2TB
$209.99$185.08View
$209.99$185.08
$185.08
See all prices
Hyte Thicc Q60$289.99ViewSee all prices
Hyte Thicc Q60$289.99ViewSee all prices

Hyte Thicc Q60
Hyte Thicc Q60
$289.99View
$289.99
$289.99
See all prices
Hyte THICC Q60 240mm AIO$299.99$264.99ViewSee all prices
Hyte THICC Q60 240mm AIO$299.99$264.99ViewSee all prices

Hyte THICC Q60 240mm AIO
Hyte THICC Q60 240mm AIO

$299.99$264.99View
$299.99$264.99
$264.99
See all prices
HYTE THICC FP12$109.99ViewSee all prices
HYTE THICC FP12$109.99ViewSee all prices
HYTE THICC FP12
HYTE THICC FP12
$109.99View
$109.99
$109.99
See all prices
We check over 250 million products every day for the best prices
We check over 250 million products every day for the best prices
The build
Step one: Remove the HAVN HS 420 VGPU from its cardboard container with incredible caution.
(Image credit: Future)
Step two: Ready the motherboard.
Image1of5(Image credit: Future)(Image credit: Future)(Image credit: Future)(Image credit: Future)(Image credit: Future)
Image1of5(Image credit: Future)(Image credit: Future)(Image credit: Future)(Image credit: Future)(Image credit: Future)
Image1of5
(Image credit: Future)(Image credit: Future)(Image credit: Future)(Image credit: Future)(Image credit: Future)
(Image credit: Future)(Image credit: Future)(Image credit: Future)(Image credit: Future)(Image credit: Future)
(Image credit: Future)
(Image credit: Future)
(Image credit: Future)
(Image credit: Future)
(Image credit: Future)
(Image credit: Future)
(Image credit: Future)
(Image credit: Future)
(Image credit: Future)
(Image credit: Future)
(Image credit: Future)
(Image credit: Future)
(Image credit: Future)
(Image credit: Future)
(Image credit: Future)
(Image credit: Future)
(Image credit: Future)
(Image credit: Future)
(Image credit: Future)
(Image credit: Future)
(Image credit: Future)
(Image credit: Future)
(Image credit: Future)
(Image credit: Future)
(Image credit: Future)
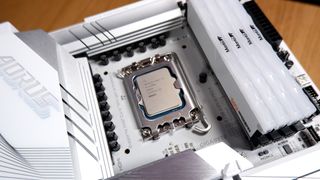
Placing the motherboard on top of the box it arrives in, I installed the memory, CPU, and SSD. This old trick saves time and effort later on in the process, though even more so for a build such as this. There’s not going to be easy access to this motherboard’s PCI slots, NVMe slots or internal headers once I install the VGPU bracket and graphics card, so best to get everything done right early in the build.
I installed both functioning DIMMs of the V-Color Manta memory into this motherboard alongside two dummy DIMMs. These are sticks fitted only with RGB lighting and intended solely to make memory look satisfyingly symmetrical. That’s a pretty desirable trait in a windowed case such as this. However, I don’t know it yet, but I will end up removing these DIMMs before the build is completed. They’re not compatible with the cooler, which is in turn not compatible with the VGPU mounting. It’s a whole thing.
The Intel Core i9 14900K slips into place snugly. I’ve not bothered adding any washers to the Independent Loading Mechanism (ILM) for this build, though if you’re using brand new parts I’d recommend it to prevent anybending that may lead to higher temps.
With everything in place, the motherboard is screwed down into the HS 420. The case supports motherboards up to E-ATX but it’s best suited to ATX or smaller to make good use of the included cable channels.
Step three: Configure the cooling.
(Image credit: Future)
It’s a smart move to plan out your cooling ahead of time with the HS 420. This isn’t your average chassis and it relies on a bottom-to-top airflow, unlike most others that are front-to-back.
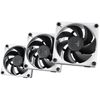
Don’t be like me. I opted for three 120 mm Thicc FP12 fans in the tilted mounting bracket in the bottom of the case—this is included in the VGPU version of the case and the standard version mounts the fans directly facing upwards—but I’m stuck having to zip-tie these in place for a secure fit. That’s because the VGPU bracket only supports three140 mmfans. These Thicc fans magnetically connect to one another anyways, which saved the day, but don’t make the same mistake as I did.
Don’t install the fans backwards and only notice once you’ve started to install the GPU bracket, either. Definitely don’t do that.
Image1of4(Image credit: Future)(Image credit: Future)(Image credit: Future)(Image credit: Future)
Image1of4(Image credit: Future)(Image credit: Future)(Image credit: Future)(Image credit: Future)
Image1of4
(Image credit: Future)(Image credit: Future)(Image credit: Future)(Image credit: Future)
(Image credit: Future)(Image credit: Future)(Image credit: Future)(Image credit: Future)
(Image credit: Future)
(Image credit: Future)
(Image credit: Future)
(Image credit: Future)
(Image credit: Future)
(Image credit: Future)
(Image credit: Future)
(Image credit: Future)
(Image credit: Future)
(Image credit: Future)
(Image credit: Future)
(Image credit: Future)
(Image credit: Future)
(Image credit: Future)
(Image credit: Future)
(Image credit: Future)
(Image credit: Future)
(Image credit: Future)
(Image credit: Future)
(Image credit: Future)
I initially installed the Q60’s pump to the Core i9 14900K in a vertical position, as Hyte intended, though once I installed the VGPU bracket and graphics card, I had to admit defeat and rotate it sideways. That’s a bit of a shame, as Hyte is yet to offer a way to run the screen in horizontal mode. Hyte told me that may be a feature it includes in its Nexus software at some point—at the very least the ability to flip the screen’s orientation 180 degrees—though it’s not available right now. As such, I’d recommend a different cooler than this—a basic 360 mm model would be a much better pick.
Image1of3(Image credit: Future)(Image credit: Future)(Image credit: Future)
Image1of3(Image credit: Future)(Image credit: Future)(Image credit: Future)
Image1of3
(Image credit: Future)(Image credit: Future)(Image credit: Future)
(Image credit: Future)(Image credit: Future)(Image credit: Future)
(Image credit: Future)
(Image credit: Future)
(Image credit: Future)
(Image credit: Future)
(Image credit: Future)
(Image credit: Future)
(Image credit: Future)
(Image credit: Future)
(Image credit: Future)
(Image credit: Future)
(Image credit: Future)
(Image credit: Future)
(Image credit: Future)
(Image credit: Future)
(Image credit: Future)
I generally found the Hyte cooling set-up extremely useful for this build. In essence, it allowed me to connect the Hyte Thicc Q60 CPU cooler to the FP12 fans in the rear with only a single cable run—a braided, magnetically attached USB Type-C. Then, from the final fan in the three-fan chain, I ran another length of cable to the LS10 RGB lighting strips. That’s CPU cooling, case cooling, and lighting connected and synced via a single cable run.
Even without this sort of simplicity, the HS 420 includes two (yes, two) fan controller hubs for easy syncing of fan speeds.
Image1of2(Image credit: Future)(Image credit: Future)
Image1of2(Image credit: Future)(Image credit: Future)
Image1of2
(Image credit: Future)(Image credit: Future)
(Image credit: Future)(Image credit: Future)
(Image credit: Future)
(Image credit: Future)
(Image credit: Future)
(Image credit: Future)
(Image credit: Future)
(Image credit: Future)
(Image credit: Future)
(Image credit: Future)
(Image credit: Future)
(Image credit: Future)
To complete my cooling configuration, I have two Noctua NF-P12 redux-1700 fans. These are fitted into the included fan brackets, which are themselves removable from the case for easy installation. One sucks cool air into the case closer to the bottom, beneath the GPU intake, and the other expels hot air out just beyond the VRM and CPU. These are both hooked up into one of the fan controllers, which is duly connected to my motherboard’s CPU fan header.
Step four: Connect those cables.
Image1of3(Image credit: Future)(Image credit: Future)(Image credit: Future)
Image1of3(Image credit: Future)(Image credit: Future)(Image credit: Future)
Image1of3
(Image credit: Future)(Image credit: Future)(Image credit: Future)
(Image credit: Future)(Image credit: Future)(Image credit: Future)
(Image credit: Future)
(Image credit: Future)
(Image credit: Future)
(Image credit: Future)
(Image credit: Future)
(Image credit: Future)
(Image credit: Future)
(Image credit: Future)
(Image credit: Future)
(Image credit: Future)
(Image credit: Future)
(Image credit: Future)
(Image credit: Future)
(Image credit: Future)
(Image credit: Future)
I unravelled the front panel connectors neatly included in the rear of the HS 420 and connected them to the motherboard’s USB, audio and front panel connectors. It’s important to do this now, as otherwise I’d have a very hard time trying to connect these once the GPU is in place. Form over function at its finest. But hey, the GPU looks fantastic when mounted this way.
Thankfully, the PSU is easily loaded into the trunk on the HS 420, and there’s ample room for cables.
I only need to run the motherboard, CPU, and PCIe cables for this build. Though a spare SATA is handy to have ready for any later expansion. I also needed a spare PCIe 6-pin connection for the Hyte cooler to connect to.
The wide cable management channels that run from the bottom to the top of the case, around the motherboard, and through the top and rear panels are simply superb. I soundly stuff each one with each of the cables as I go, strapping them in place, and taking them where they need to go. I was not neat about it, but that doesn’t really matter, as they all fit snugly in the generous cable management system.
Step five: Mount the GPU.
(Image credit: Future)
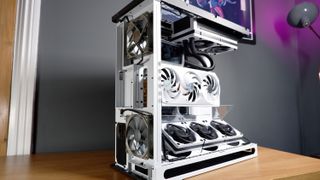
The highlight of the build has to be the vertically mounted graphics card. An RTX 4080 Super with a fresh white paint job will occupy most of my eyeline once installed, but I had to make sure not to mess it up before I got there.
Except for the screen mounted on top of the cold plate on the CPU. That was an issue. I ended up having to spin the cooler to accommodate the long screen, which meant the arm holding the screen in place sat overtop the RAM. That then meant I had to ditch the closest DIMM to the CPU socket, one of my two dummy DIMMs, and I wasn’t going to keep the other around in that case.
So the dummy DIMMs were gone, and the screen on the cooler was the wrong way around, but at least the graphics card was sitting pretty.
With my CPU cooler reoriented, my only other concern was that the graphics card brushes up against a piece of glass used to direct air away from the backside of the GPU and across the intake fans. I was mostly concerned about vibration creating excessive noise, though in my testing I didn’t come across anything noticeable. Still, I did test thermals with both the glass included and removed, and both times temperatures stayed near-enough the same. So I wouldn’t worry about ditching it altogether.
Step six: Reassemble.
Image1of2(Image credit: Future)(Image credit: Future)
Image1of2(Image credit: Future)(Image credit: Future)
Image1of2
(Image credit: Future)(Image credit: Future)
(Image credit: Future)(Image credit: Future)
(Image credit: Future)
(Image credit: Future)
(Image credit: Future)
(Image credit: Future)
(Image credit: Future)
(Image credit: Future)
(Image credit: Future)
(Image credit: Future)
(Image credit: Future)
(Image credit: Future)
One final check over and I’m ready to reassemble the side panels. That means checking each cable, connection, and fan orientation. That last bit is extremely important if, like me, you realise you put the entire bottom row of fans in the wrong way around. Luckily, magnetically attached fans with only a handful of screws in them make for an easy switch.
Then, on with the dust filters and panels. The HS 420 comes with a large dust filter for the underside intake, though I was surprised to see a compact single-fan dust filter included for the rear lower intake, too.
One addition I made at the last minute with this build was a little bit of black electrical tape along the lower edge of the curved panel. Some might disagree with this sorta thing, but I feel the black tape is a neat way to cover up the RGB LED strips I’ve run along the bottom of the case. If these light strips were diffused, maybe I’d not bother with the tape, but seeing as the LS10 is bare LEDs, I prefer to cover up the strips themselves.
Step seven: Plug it in and press the button.
With every panel now back on the chassis, I hit the power switch on the PSU to give this PC a test run.
So… did it post right away?
The performance
This PC posted right away. Phew. It booted into the BIOS screen where I promptly installed the latest version to stave off any concerns of instability with this 14900K.
With Windows 11 installed and fully updated, it’s time to play some games and get an idea of this PC’s performance.
The RTX 4080 Super delivers superb frame rates in combination with the Core i9 14900K. That’s hardly surprising but it is incredibly satisfying to game on nonetheless.
I carry out all gaming tests at 1440p, which offers a happy medium of frame rates upwards of 100 fps in Avatar: Frontiers of Pandora and Metro Exodus Enhanced Edition. With DLSS and Frame Generation enabled, I am able to hit over 100 fps in Cyberpunk 2077, too.
The most impressive feat is that throughout my testing, the GPU keeps extremely cool. During a pretty lengthy three run test of Metro Exodus Enhanced Edition, which I use to measure thermals while gaming, I saw the GPU temperature peak at 60°C only, with an average of 57°C. This seems pretty spectacular, so I’ve dug into the data collected using Nvidia’s Frameview tool in the other games tested to find out more.
Yep, the GPU never exceeded 60°C in any other game. In fact, there are Baldur’s Gate 3 runs where the average temperature is in the mid-forties. That’s a real win for the cooling solution both on this card and inside the Havn HS 420.
It should come as no surprise that an overkill rig such as this is able to shred through Cinebench R24, 3DMark, and various productivity and encoding benchmarks with ease. Though I am a little surprised to see high CPU temperatures from the Thicc Q60 liquid cooler. The Core i9 14900K is often too hot to handle with intensive workloads, as evidenced here.
I’d wanted to keep my chip from hitting 100°C at all costs, but unfortunately it isn’t to be. Another reason why a bigger CPU cooler might be a smart decision.
The conclusion
(Image credit: Future)
I won’t wax lyrical about this build’s top performance too long—that’s a little bit too much like patting myself on the back for a job well done. And evidently, some things didn’t go quite as planned. Though I will wrap up with a couple of reflections on what went right, what went wrong, and where I’d do things differently next time.
The case was a huge success. I don’t regret for a second opting for the vertical GPU mount, even though it makes changing out an SSD or plugging in an internal USB header an absolute nightmare. It’s all worth it for the overall finish of the build, which I still haven’t got sick of staring at as of yet. Sadly, I have to take it all apart before I will.
Though I do wish I’d been able to get the correct size fans for the mount included with the VGPU. Similarly, I should have been more aware of the size constraints for the CPU cooler, screen, and RAM. I was blissfully unaware of the clearance issues until I was face to face with them, which led to a couple unfortunate misses, such as being unable to use the screen to its fullest potential or sticking a couple extra DIMMs in the machine just for extra style points.
(Image credit: Future)
Though I cannot fault it for overall style and performance, there are ways I could have levelled it up further, such as with white sleeved power cables or a PSU that supports a native 12x6 power connector. Also not using a PSU with a very expensive and unnecessary additional screen when you know it’s going to be hidden in the back of the case would be a start.
Honestly, I got lucky a few times with this build, a few less fantastical parts and a few more reasonable parts would’ve saved me a lot of hassle. But it all actually worked out, this time. Perhaps the moral of the story is to not get too carried away with ideas—I foolishly wanted a screenanda vertically-mounted GPU within one mid-tower PC case—or just to roll with the punches when it doesn’t all go quite right. Either way, this remains one of the loveliest gaming PCs I’ve ever built, and I’m glad I did.
Now, to take it all apart and start again fresh next month.
TOPICSHardware
TOPICS
More about gaming pcsThis Jinx-inspired gaming PC is my favorite of CES 2025 and I’m head over heels for the hardwareThe 2025 Asus ROG NUC looks epic and has some mighty specs but a desktop gaming PC will probably be far better value for moneyLatestThe Last of Us season 2 trailer is a brief look at a story you should probably just play yourself in AprilSee more latest►
More about gaming pcsThis Jinx-inspired gaming PC is my favorite of CES 2025 and I’m head over heels for the hardwareThe 2025 Asus ROG NUC looks epic and has some mighty specs but a desktop gaming PC will probably be far better value for moneyLatestThe Last of Us season 2 trailer is a brief look at a story you should probably just play yourself in AprilSee more latest►
More about gaming pcsThis Jinx-inspired gaming PC is my favorite of CES 2025 and I’m head over heels for the hardwareThe 2025 Asus ROG NUC looks epic and has some mighty specs but a desktop gaming PC will probably be far better value for money
More about gaming pcs
This Jinx-inspired gaming PC is my favorite of CES 2025 and I’m head over heels for the hardwareThe 2025 Asus ROG NUC looks epic and has some mighty specs but a desktop gaming PC will probably be far better value for money
This Jinx-inspired gaming PC is my favorite of CES 2025 and I’m head over heels for the hardware
This Jinx-inspired gaming PC is my favorite of CES 2025 and I’m head over heels for the hardware
The 2025 Asus ROG NUC looks epic and has some mighty specs but a desktop gaming PC will probably be far better value for money
The 2025 Asus ROG NUC looks epic and has some mighty specs but a desktop gaming PC will probably be far better value for money
LatestThe Last of Us season 2 trailer is a brief look at a story you should probably just play yourself in AprilSee more latest►
Latest
The Last of Us season 2 trailer is a brief look at a story you should probably just play yourself in April
The Last of Us season 2 trailer is a brief look at a story you should probably just play yourself in April
The Last of Us season 2 trailer is a brief look at a story you should probably just play yourself in April
See more latest►
Most Popular
The Witcher 3’s now 2-year-old bonus quest is our first taste of the ‘vibe’ CD Projekt is going for in The Witcher 4
2024 was the year updates for old games beat out all the new ones for me
Train like you game with this adventure-inspired workout
‘It’s simply impossible to make a difficulty level that’s just right for all players’: How Final Fantasy 14’s lead battle designer has been playing a precarious balancing game for Dawntrail’s dungeons and raids
Please join me in getting super excited for all the cool looking survival games coming in 2025 (and beyond)
Competitive shooters are at a crucial crossroads in 2025: ‘sweaty’ teamplay vs. casual fun
Call of Duty’s $28 Squid Game skins are the perfect crossover for our capitalist dystopia, and Activision knows exactly what it’s doing
These are the 14 biggest upcoming RPGs of 2025—get ready for another amazing year for the genre
Five new Steam games you probably missed (January 6, 2025)
I’ve seen enough: No more forcing singleplayer studios to make mediocre live service games
HARDWARE BUYING GUIDESLATEST GAME REVIEWS1Best Steam Deck accessories in Australia for 2025: Our favorite docks, powerbanks and gamepads2Best graphics card for laptops: the mobile GPUs I’d want in my next gaming laptop3Best mini PCs in 2025: The compact computers I love the most4Best 14-inch gaming laptop: The top compact gaming laptops I’ve held in these hands5Best Mini-ITX motherboards in 2025: My pick from all the mini mobo marvels I’ve tested1Thank Goodness You’re Here! review: An anarchic treasure trove of jokes and skits2Shiren the Wanderer: The Mystery Dungeon of Serpentcoil Island review—like juggling chainsaws on horseback3WD Black SN850X 8 TB NVMe SSD review4Ikea Utespelare desk review5Asus ROG Harpe Ace Mini wireless mouse review
HARDWARE BUYING GUIDESLATEST GAME REVIEWS1Best Steam Deck accessories in Australia for 2025: Our favorite docks, powerbanks and gamepads2Best graphics card for laptops: the mobile GPUs I’d want in my next gaming laptop3Best mini PCs in 2025: The compact computers I love the most4Best 14-inch gaming laptop: The top compact gaming laptops I’ve held in these hands5Best Mini-ITX motherboards in 2025: My pick from all the mini mobo marvels I’ve tested1Thank Goodness You’re Here! review: An anarchic treasure trove of jokes and skits2Shiren the Wanderer: The Mystery Dungeon of Serpentcoil Island review—like juggling chainsaws on horseback3WD Black SN850X 8 TB NVMe SSD review4Ikea Utespelare desk review5Asus ROG Harpe Ace Mini wireless mouse review
HARDWARE BUYING GUIDESLATEST GAME REVIEWS1Best Steam Deck accessories in Australia for 2025: Our favorite docks, powerbanks and gamepads2Best graphics card for laptops: the mobile GPUs I’d want in my next gaming laptop3Best mini PCs in 2025: The compact computers I love the most4Best 14-inch gaming laptop: The top compact gaming laptops I’ve held in these hands5Best Mini-ITX motherboards in 2025: My pick from all the mini mobo marvels I’ve tested1Thank Goodness You’re Here! review: An anarchic treasure trove of jokes and skits2Shiren the Wanderer: The Mystery Dungeon of Serpentcoil Island review—like juggling chainsaws on horseback3WD Black SN850X 8 TB NVMe SSD review4Ikea Utespelare desk review5Asus ROG Harpe Ace Mini wireless mouse review
HARDWARE BUYING GUIDESLATEST GAME REVIEWS1Best Steam Deck accessories in Australia for 2025: Our favorite docks, powerbanks and gamepads2Best graphics card for laptops: the mobile GPUs I’d want in my next gaming laptop3Best mini PCs in 2025: The compact computers I love the most4Best 14-inch gaming laptop: The top compact gaming laptops I’ve held in these hands5Best Mini-ITX motherboards in 2025: My pick from all the mini mobo marvels I’ve tested1Thank Goodness You’re Here! review: An anarchic treasure trove of jokes and skits2Shiren the Wanderer: The Mystery Dungeon of Serpentcoil Island review—like juggling chainsaws on horseback3WD Black SN850X 8 TB NVMe SSD review4Ikea Utespelare desk review5Asus ROG Harpe Ace Mini wireless mouse review
HARDWARE BUYING GUIDESLATEST GAME REVIEWS
1Best Steam Deck accessories in Australia for 2025: Our favorite docks, powerbanks and gamepads
1Best Steam Deck accessories in Australia for 2025: Our favorite docks, powerbanks and gamepads
1
Best Steam Deck accessories in Australia for 2025: Our favorite docks, powerbanks and gamepads
2Best graphics card for laptops: the mobile GPUs I’d want in my next gaming laptop
2Best graphics card for laptops: the mobile GPUs I’d want in my next gaming laptop
2
Best graphics card for laptops: the mobile GPUs I’d want in my next gaming laptop
3Best mini PCs in 2025: The compact computers I love the most
3Best mini PCs in 2025: The compact computers I love the most
3
Best mini PCs in 2025: The compact computers I love the most
4Best 14-inch gaming laptop: The top compact gaming laptops I’ve held in these hands
4Best 14-inch gaming laptop: The top compact gaming laptops I’ve held in these hands
4
Best 14-inch gaming laptop: The top compact gaming laptops I’ve held in these hands
5Best Mini-ITX motherboards in 2025: My pick from all the mini mobo marvels I’ve tested
5Best Mini-ITX motherboards in 2025: My pick from all the mini mobo marvels I’ve tested
5
Best Mini-ITX motherboards in 2025: My pick from all the mini mobo marvels I’ve tested
1Thank Goodness You’re Here! review: An anarchic treasure trove of jokes and skits
1Thank Goodness You’re Here! review: An anarchic treasure trove of jokes and skits
1
Thank Goodness You’re Here! review: An anarchic treasure trove of jokes and skits
2Shiren the Wanderer: The Mystery Dungeon of Serpentcoil Island review—like juggling chainsaws on horseback
2Shiren the Wanderer: The Mystery Dungeon of Serpentcoil Island review—like juggling chainsaws on horseback
2
Shiren the Wanderer: The Mystery Dungeon of Serpentcoil Island review—like juggling chainsaws on horseback
3WD Black SN850X 8 TB NVMe SSD review
3WD Black SN850X 8 TB NVMe SSD review
3
WD Black SN850X 8 TB NVMe SSD review
4Ikea Utespelare desk review
4Ikea Utespelare desk review
4
Ikea Utespelare desk review
5Asus ROG Harpe Ace Mini wireless mouse review
5Asus ROG Harpe Ace Mini wireless mouse review
5
Asus ROG Harpe Ace Mini wireless mouse review
