GamesAdventurePrince of Persia: The Lost CrownHow to solve the Sacred Archive time puzzles in Prince of Persia: The Lost CrownWhen you purchase through links on our site, we may earn an affiliate commission.Here’s how it works.
GamesAdventurePrince of Persia: The Lost CrownHow to solve the Sacred Archive time puzzles in Prince of Persia: The Lost CrownWhen you purchase through links on our site, we may earn an affiliate commission.Here’s how it works.
When you purchase through links on our site, we may earn an affiliate commission.Here’s how it works.
(Image credit: Ubisoft)
Jump to:First Secret Room (bottom left portal)Second Secret Room (top left portal)Third Secret Room (bottom right portal)Fourth Secret Room (top right portal)
Jump to:First Secret Room (bottom left portal)Second Secret Room (top left portal)Third Secret Room (bottom right portal)Fourth Secret Room (top right portal)
Conquer Mount Qaf with these Prince of Persia guides(Image credit: Ubisoft)Prince of Persia fast travel:How to unlockPrince of Persia sidequests:Where to find eachPrince of Persia Amulets:Powerful trinketsPrince of Persia The Deserter quest:Help the lost soldier
Conquer Mount Qaf with these Prince of Persia guides
(Image credit: Ubisoft)Prince of Persia fast travel:How to unlockPrince of Persia sidequests:Where to find eachPrince of Persia Amulets:Powerful trinketsPrince of Persia The Deserter quest:Help the lost soldier
(Image credit: Ubisoft)
Prince of Persia fast travel:How to unlockPrince of Persia sidequests:Where to find eachPrince of Persia Amulets:Powerful trinketsPrince of Persia The Deserter quest:Help the lost soldier
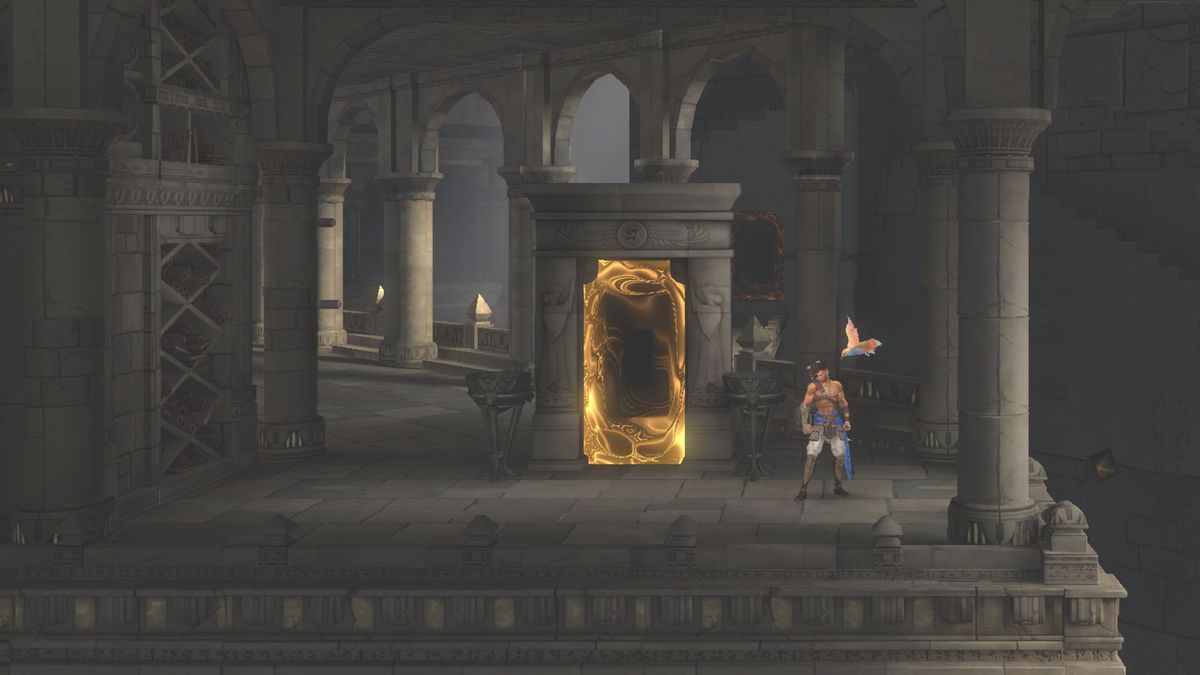
TheSacred Archive puzzlesinPrince of Persia: The Lost Crownare some of the most challenging in the game, requiring you to use your smarts in order to earn theClairvoyancepower. What makes these fourSecret Roomsa challenge is that each puzzle requires you to use multiple versions of your character, Sargon, to activate switches and use powers to grab the tablet at the end of each trial—all with a ticking clock.
This makes timing a tricky component, as you have to wait for previous Sargons to activate the platforms and walls necessary for your final Sargon to make their way to the prize. If you’d rather just have a solution straight away and head off to the Pit of Eternal Sands, here’s what you need to do to solve each of the Sacred Archive puzzles.
First Secret Room (bottom left portal)
Image1of2The first portal in the bottom right of the room(Image credit: Ubisoft)Use the first and second Sargons to activate the switches on either wall(Image credit: Ubisoft)
Image1of2The first portal in the bottom right of the room(Image credit: Ubisoft)Use the first and second Sargons to activate the switches on either wall(Image credit: Ubisoft)
Image1of2
The first portal in the bottom right of the room(Image credit: Ubisoft)Use the first and second Sargons to activate the switches on either wall(Image credit: Ubisoft)
The first portal in the bottom right of the room(Image credit: Ubisoft)Use the first and second Sargons to activate the switches on either wall(Image credit: Ubisoft)
The first portal in the bottom right of the room(Image credit: Ubisoft)
The first portal in the bottom right of the room(Image credit: Ubisoft)
The first portal in the bottom right of the room(Image credit: Ubisoft)
The first portal in the bottom right of the room(Image credit: Ubisoft)
The first portal in the bottom right of the room(Image credit: Ubisoft)

Use the first and second Sargons to activate the switches on either wall(Image credit: Ubisoft)
Use the first and second Sargons to activate the switches on either wall(Image credit: Ubisoft)
Use the first and second Sargons to activate the switches on either wall(Image credit: Ubisoft)
Use the first and second Sargons to activate the switches on either wall(Image credit: Ubisoft)
Use the first and second Sargons to activate the switches on either wall(Image credit: Ubisoft)
The first room is an easy introduction to the puzzle concept of using three different Sargons to activate switches and get where you need to go. Simply activate the switches on the left and right walls using your first and second Sargons respectively, then send your third to grab the tablet.
Second Secret Room (top left portal)
Image1of3The second portal in the top left of the room(Image credit: Ubisoft)Use Shadow of the Simurgh to create a warp point with your first Sargon(Image credit: Ubisoft)Your second Sargon can then warp to that point and make it to the pressure plate in time(Image credit: Ubisoft)
Image1of3The second portal in the top left of the room(Image credit: Ubisoft)Use Shadow of the Simurgh to create a warp point with your first Sargon(Image credit: Ubisoft)Your second Sargon can then warp to that point and make it to the pressure plate in time(Image credit: Ubisoft)
Image1of3
The second portal in the top left of the room(Image credit: Ubisoft)Use Shadow of the Simurgh to create a warp point with your first Sargon(Image credit: Ubisoft)Your second Sargon can then warp to that point and make it to the pressure plate in time(Image credit: Ubisoft)
The second portal in the top left of the room(Image credit: Ubisoft)Use Shadow of the Simurgh to create a warp point with your first Sargon(Image credit: Ubisoft)Your second Sargon can then warp to that point and make it to the pressure plate in time(Image credit: Ubisoft)
The second portal in the top left of the room(Image credit: Ubisoft)
The second portal in the top left of the room(Image credit: Ubisoft)
The second portal in the top left of the room(Image credit: Ubisoft)
The second portal in the top left of the room(Image credit: Ubisoft)
The second portal in the top left of the room(Image credit: Ubisoft)
Use Shadow of the Simurgh to create a warp point with your first Sargon(Image credit: Ubisoft)
Use Shadow of the Simurgh to create a warp point with your first Sargon(Image credit: Ubisoft)
Use Shadow of the Simurgh to create a warp point with your first Sargon(Image credit: Ubisoft)
Use Shadow of the Simurgh to create a warp point with your first Sargon(Image credit: Ubisoft)
Use Shadow of the Simurgh to create a warp point with your first Sargon(Image credit: Ubisoft)
Your second Sargon can then warp to that point and make it to the pressure plate in time(Image credit: Ubisoft)
Your second Sargon can then warp to that point and make it to the pressure plate in time(Image credit: Ubisoft)
Your second Sargon can then warp to that point and make it to the pressure plate in time(Image credit: Ubisoft)
Your second Sargon can then warp to that point and make it to the pressure plate in time(Image credit: Ubisoft)
Your second Sargon can then warp to that point and make it to the pressure plate in time(Image credit: Ubisoft)
This one is a bit harder and requires you to use the Shadow of the Simurgh ability with your first Sargon to create a warp point that your second Sargon can then use to get to the pressure plate at the top of the room and activate it before the time runs out.
Third Secret Room (bottom right portal)
Image1of4The third portal in the bottom right of the room(Image credit: Ubisoft)Activate the pull switch with your first Sargon for a few seconds then jump back onto the pressure plate in the centre(Image credit: Ubisoft)Climb to the next level and activate the switch with your second Sargon(Image credit: Ubisoft)Follow the path of the second Sargon with your third, then wait for the first to activate the pressure plate so you can jump up to the tablet(Image credit: Ubisoft)
Image1of4The third portal in the bottom right of the room(Image credit: Ubisoft)Activate the pull switch with your first Sargon for a few seconds then jump back onto the pressure plate in the centre(Image credit: Ubisoft)Climb to the next level and activate the switch with your second Sargon(Image credit: Ubisoft)Follow the path of the second Sargon with your third, then wait for the first to activate the pressure plate so you can jump up to the tablet(Image credit: Ubisoft)
Image1of4
The third portal in the bottom right of the room(Image credit: Ubisoft)Activate the pull switch with your first Sargon for a few seconds then jump back onto the pressure plate in the centre(Image credit: Ubisoft)Climb to the next level and activate the switch with your second Sargon(Image credit: Ubisoft)Follow the path of the second Sargon with your third, then wait for the first to activate the pressure plate so you can jump up to the tablet(Image credit: Ubisoft)
The third portal in the bottom right of the room(Image credit: Ubisoft)Activate the pull switch with your first Sargon for a few seconds then jump back onto the pressure plate in the centre(Image credit: Ubisoft)Climb to the next level and activate the switch with your second Sargon(Image credit: Ubisoft)Follow the path of the second Sargon with your third, then wait for the first to activate the pressure plate so you can jump up to the tablet(Image credit: Ubisoft)
The third portal in the bottom right of the room(Image credit: Ubisoft)
The third portal in the bottom right of the room(Image credit: Ubisoft)
The third portal in the bottom right of the room(Image credit: Ubisoft)
The third portal in the bottom right of the room(Image credit: Ubisoft)
The third portal in the bottom right of the room(Image credit: Ubisoft)
Activate the pull switch with your first Sargon for a few seconds then jump back onto the pressure plate in the centre(Image credit: Ubisoft)
Activate the pull switch with your first Sargon for a few seconds then jump back onto the pressure plate in the centre(Image credit: Ubisoft)
Activate the pull switch with your first Sargon for a few seconds then jump back onto the pressure plate in the centre(Image credit: Ubisoft)
Activate the pull switch with your first Sargon for a few seconds then jump back onto the pressure plate in the centre(Image credit: Ubisoft)
Activate the pull switch with your first Sargon for a few seconds then jump back onto the pressure plate in the centre(Image credit: Ubisoft)
Climb to the next level and activate the switch with your second Sargon(Image credit: Ubisoft)
Climb to the next level and activate the switch with your second Sargon(Image credit: Ubisoft)
Climb to the next level and activate the switch with your second Sargon(Image credit: Ubisoft)
Climb to the next level and activate the switch with your second Sargon(Image credit: Ubisoft)
Climb to the next level and activate the switch with your second Sargon(Image credit: Ubisoft)
Follow the path of the second Sargon with your third, then wait for the first to activate the pressure plate so you can jump up to the tablet(Image credit: Ubisoft)
Follow the path of the second Sargon with your third, then wait for the first to activate the pressure plate so you can jump up to the tablet(Image credit: Ubisoft)
Follow the path of the second Sargon with your third, then wait for the first to activate the pressure plate so you can jump up to the tablet(Image credit: Ubisoft)
Follow the path of the second Sargon with your third, then wait for the first to activate the pressure plate so you can jump up to the tablet(Image credit: Ubisoft)
Follow the path of the second Sargon with your third, then wait for the first to activate the pressure plate so you can jump up to the tablet(Image credit: Ubisoft)
This room is tricky since it requires you to perform multiple tasks with your first Sargon in order to open the way to the tablet at the top of the chamber.
The biggest gaming news, reviews and hardware deals
Here’s what to do with each Sargon:
Fourth Secret Room (top right portal)
Image1of5The fourth portal in the top right of the room(Image credit: Ubisoft)Use your first Sargon to activate the pressure plate, stepping off and on quickly after a few seconds(Image credit: Ubisoft)Wall jump through the trap door with your second Sargon to activate the switch before dropping down(Image credit: Ubisoft)When the first Sargon steps off the pressure plate use dash and Shadow of the Simurgh to leave a warp point on the trapdoor’s far side(Image credit: Ubisoft)Once the platform is active and the switch is pulled, use the warp point with your third Sargon and continue climbing to the tablet(Image credit: Ubisoft)
Image1of5The fourth portal in the top right of the room(Image credit: Ubisoft)Use your first Sargon to activate the pressure plate, stepping off and on quickly after a few seconds(Image credit: Ubisoft)Wall jump through the trap door with your second Sargon to activate the switch before dropping down(Image credit: Ubisoft)When the first Sargon steps off the pressure plate use dash and Shadow of the Simurgh to leave a warp point on the trapdoor’s far side(Image credit: Ubisoft)Once the platform is active and the switch is pulled, use the warp point with your third Sargon and continue climbing to the tablet(Image credit: Ubisoft)
Image1of5
The fourth portal in the top right of the room(Image credit: Ubisoft)Use your first Sargon to activate the pressure plate, stepping off and on quickly after a few seconds(Image credit: Ubisoft)Wall jump through the trap door with your second Sargon to activate the switch before dropping down(Image credit: Ubisoft)When the first Sargon steps off the pressure plate use dash and Shadow of the Simurgh to leave a warp point on the trapdoor’s far side(Image credit: Ubisoft)Once the platform is active and the switch is pulled, use the warp point with your third Sargon and continue climbing to the tablet(Image credit: Ubisoft)
The fourth portal in the top right of the room(Image credit: Ubisoft)Use your first Sargon to activate the pressure plate, stepping off and on quickly after a few seconds(Image credit: Ubisoft)Wall jump through the trap door with your second Sargon to activate the switch before dropping down(Image credit: Ubisoft)When the first Sargon steps off the pressure plate use dash and Shadow of the Simurgh to leave a warp point on the trapdoor’s far side(Image credit: Ubisoft)Once the platform is active and the switch is pulled, use the warp point with your third Sargon and continue climbing to the tablet(Image credit: Ubisoft)
The fourth portal in the top right of the room(Image credit: Ubisoft)
The fourth portal in the top right of the room(Image credit: Ubisoft)
The fourth portal in the top right of the room(Image credit: Ubisoft)
The fourth portal in the top right of the room(Image credit: Ubisoft)
The fourth portal in the top right of the room(Image credit: Ubisoft)
Use your first Sargon to activate the pressure plate, stepping off and on quickly after a few seconds(Image credit: Ubisoft)
Use your first Sargon to activate the pressure plate, stepping off and on quickly after a few seconds(Image credit: Ubisoft)
Use your first Sargon to activate the pressure plate, stepping off and on quickly after a few seconds(Image credit: Ubisoft)
Use your first Sargon to activate the pressure plate, stepping off and on quickly after a few seconds(Image credit: Ubisoft)
Use your first Sargon to activate the pressure plate, stepping off and on quickly after a few seconds(Image credit: Ubisoft)
Wall jump through the trap door with your second Sargon to activate the switch before dropping down(Image credit: Ubisoft)
Wall jump through the trap door with your second Sargon to activate the switch before dropping down(Image credit: Ubisoft)
Wall jump through the trap door with your second Sargon to activate the switch before dropping down(Image credit: Ubisoft)
Wall jump through the trap door with your second Sargon to activate the switch before dropping down(Image credit: Ubisoft)
Wall jump through the trap door with your second Sargon to activate the switch before dropping down(Image credit: Ubisoft)
When the first Sargon steps off the pressure plate use dash and Shadow of the Simurgh to leave a warp point on the trapdoor’s far side(Image credit: Ubisoft)
When the first Sargon steps off the pressure plate use dash and Shadow of the Simurgh to leave a warp point on the trapdoor’s far side(Image credit: Ubisoft)
When the first Sargon steps off the pressure plate use dash and Shadow of the Simurgh to leave a warp point on the trapdoor’s far side(Image credit: Ubisoft)
When the first Sargon steps off the pressure plate use dash and Shadow of the Simurgh to leave a warp point on the trapdoor’s far side(Image credit: Ubisoft)
When the first Sargon steps off the pressure plate use dash and Shadow of the Simurgh to leave a warp point on the trapdoor’s far side(Image credit: Ubisoft)
Once the platform is active and the switch is pulled, use the warp point with your third Sargon and continue climbing to the tablet(Image credit: Ubisoft)
Once the platform is active and the switch is pulled, use the warp point with your third Sargon and continue climbing to the tablet(Image credit: Ubisoft)
Once the platform is active and the switch is pulled, use the warp point with your third Sargon and continue climbing to the tablet(Image credit: Ubisoft)
Once the platform is active and the switch is pulled, use the warp point with your third Sargon and continue climbing to the tablet(Image credit: Ubisoft)
Once the platform is active and the switch is pulled, use the warp point with your third Sargon and continue climbing to the tablet(Image credit: Ubisoft)
This one is the hardest, since it combines using the Shadow of the Simurgh ability from the second puzzle while having a Sargon perform multiple tasks like in the third.
Here’s each step:
When you’ve completed all four secret rooms, the barriers blocking the central portal will disappear, so you can head inside and grab the Clairvoyance power. If you’ve also been to the Soma Tree and fought Kiana, you’ll now be able to make your way into the Pit of Eternal Sands and continue the story.
TOPICSUbisoft
TOPICS
More about adventureThank Goodness You’re Here! reviewTrain like you game with this adventure-inspired workoutLatestThe best part of Marvel Rivals Season 1 is Mister Fantastic’s obnoxiously fun chest-bump attack and his ridiculously OP kitSee more latest►
More about adventureThank Goodness You’re Here! reviewTrain like you game with this adventure-inspired workoutLatestThe best part of Marvel Rivals Season 1 is Mister Fantastic’s obnoxiously fun chest-bump attack and his ridiculously OP kitSee more latest►
More about adventureThank Goodness You’re Here! reviewTrain like you game with this adventure-inspired workout
More about adventure
Thank Goodness You’re Here! reviewTrain like you game with this adventure-inspired workout
Thank Goodness You’re Here! review
Thank Goodness You’re Here! review
Train like you game with this adventure-inspired workout
Train like you game with this adventure-inspired workout
LatestThe best part of Marvel Rivals Season 1 is Mister Fantastic’s obnoxiously fun chest-bump attack and his ridiculously OP kitSee more latest►
Latest
The best part of Marvel Rivals Season 1 is Mister Fantastic’s obnoxiously fun chest-bump attack and his ridiculously OP kit
The best part of Marvel Rivals Season 1 is Mister Fantastic’s obnoxiously fun chest-bump attack and his ridiculously OP kit
The best part of Marvel Rivals Season 1 is Mister Fantastic’s obnoxiously fun chest-bump attack and his ridiculously OP kit
See more latest►
Most Popular
‘It’s simply impossible to make a difficulty level that’s just right for all players’: How Final Fantasy 14’s lead battle designer has been playing a precarious balancing game for Dawntrail’s dungeons and raids
Please join me in getting super excited for all the cool looking survival games coming in 2025 (and beyond)
Competitive shooters are at a crucial crossroads in 2025: ‘sweaty’ teamplay vs. casual fun
Call of Duty’s $28 Squid Game skins are the perfect crossover for our capitalist dystopia, and Activision knows exactly what it’s doing
These are the 14 biggest upcoming RPGs of 2025—get ready for another amazing year for the genre
Five new Steam games you probably missed (January 6, 2025)
I’ve seen enough: No more forcing singleplayer studios to make mediocre live service games
6 games that could be bigger hits than you’re expecting in 2025
What are your 2025 gaming resolutions?
The FBI put a $5 million bounty on the ‘Cryptoqueen’ last year but still hasn’t found her, so take your pick: Russia, South Africa, or murdered on a yacht in 2018
HARDWARE BUYING GUIDESLATEST GAME REVIEWS1Best Steam Deck accessories in Australia for 2025: Our favorite docks, powerbanks and gamepads2Best graphics card for laptops: the mobile GPUs I’d want in my next gaming laptop3Best mini PCs in 2025: The compact computers I love the most4Best 14-inch gaming laptop: The top compact gaming laptops I’ve held in these hands5Best Mini-ITX motherboards in 2025: My pick from all the mini mobo marvels I’ve tested1Thank Goodness You’re Here! review2Shiren the Wanderer: The Mystery Dungeon of Serpentcoil Island review3WD Black SN850X 8 TB NVMe SSD review4Ikea Utespelare desk review5Asus ROG Harpe Ace Mini wireless mouse review
HARDWARE BUYING GUIDESLATEST GAME REVIEWS1Best Steam Deck accessories in Australia for 2025: Our favorite docks, powerbanks and gamepads2Best graphics card for laptops: the mobile GPUs I’d want in my next gaming laptop3Best mini PCs in 2025: The compact computers I love the most4Best 14-inch gaming laptop: The top compact gaming laptops I’ve held in these hands5Best Mini-ITX motherboards in 2025: My pick from all the mini mobo marvels I’ve tested1Thank Goodness You’re Here! review2Shiren the Wanderer: The Mystery Dungeon of Serpentcoil Island review3WD Black SN850X 8 TB NVMe SSD review4Ikea Utespelare desk review5Asus ROG Harpe Ace Mini wireless mouse review
HARDWARE BUYING GUIDESLATEST GAME REVIEWS1Best Steam Deck accessories in Australia for 2025: Our favorite docks, powerbanks and gamepads2Best graphics card for laptops: the mobile GPUs I’d want in my next gaming laptop3Best mini PCs in 2025: The compact computers I love the most4Best 14-inch gaming laptop: The top compact gaming laptops I’ve held in these hands5Best Mini-ITX motherboards in 2025: My pick from all the mini mobo marvels I’ve tested1Thank Goodness You’re Here! review2Shiren the Wanderer: The Mystery Dungeon of Serpentcoil Island review3WD Black SN850X 8 TB NVMe SSD review4Ikea Utespelare desk review5Asus ROG Harpe Ace Mini wireless mouse review
HARDWARE BUYING GUIDESLATEST GAME REVIEWS1Best Steam Deck accessories in Australia for 2025: Our favorite docks, powerbanks and gamepads2Best graphics card for laptops: the mobile GPUs I’d want in my next gaming laptop3Best mini PCs in 2025: The compact computers I love the most4Best 14-inch gaming laptop: The top compact gaming laptops I’ve held in these hands5Best Mini-ITX motherboards in 2025: My pick from all the mini mobo marvels I’ve tested1Thank Goodness You’re Here! review2Shiren the Wanderer: The Mystery Dungeon of Serpentcoil Island review3WD Black SN850X 8 TB NVMe SSD review4Ikea Utespelare desk review5Asus ROG Harpe Ace Mini wireless mouse review
HARDWARE BUYING GUIDESLATEST GAME REVIEWS
1Best Steam Deck accessories in Australia for 2025: Our favorite docks, powerbanks and gamepads
1Best Steam Deck accessories in Australia for 2025: Our favorite docks, powerbanks and gamepads
1
Best Steam Deck accessories in Australia for 2025: Our favorite docks, powerbanks and gamepads
2Best graphics card for laptops: the mobile GPUs I’d want in my next gaming laptop
2Best graphics card for laptops: the mobile GPUs I’d want in my next gaming laptop
2
Best graphics card for laptops: the mobile GPUs I’d want in my next gaming laptop
3Best mini PCs in 2025: The compact computers I love the most
3Best mini PCs in 2025: The compact computers I love the most
3
Best mini PCs in 2025: The compact computers I love the most
4Best 14-inch gaming laptop: The top compact gaming laptops I’ve held in these hands
4Best 14-inch gaming laptop: The top compact gaming laptops I’ve held in these hands
4
Best 14-inch gaming laptop: The top compact gaming laptops I’ve held in these hands
5Best Mini-ITX motherboards in 2025: My pick from all the mini mobo marvels I’ve tested
5Best Mini-ITX motherboards in 2025: My pick from all the mini mobo marvels I’ve tested
5
Best Mini-ITX motherboards in 2025: My pick from all the mini mobo marvels I’ve tested
1Thank Goodness You’re Here! review
1Thank Goodness You’re Here! review
1
Thank Goodness You’re Here! review
2Shiren the Wanderer: The Mystery Dungeon of Serpentcoil Island review
2Shiren the Wanderer: The Mystery Dungeon of Serpentcoil Island review
2
Shiren the Wanderer: The Mystery Dungeon of Serpentcoil Island review
3WD Black SN850X 8 TB NVMe SSD review
3WD Black SN850X 8 TB NVMe SSD review
3
WD Black SN850X 8 TB NVMe SSD review
4Ikea Utespelare desk review
4Ikea Utespelare desk review
4
Ikea Utespelare desk review
5Asus ROG Harpe Ace Mini wireless mouse review
5Asus ROG Harpe Ace Mini wireless mouse review
5
Asus ROG Harpe Ace Mini wireless mouse review
